Brigitte's step-by-step makeup tutorial

You know what goes really well with the perfect outfit? The perfect makeup routine! We recently shared a guide to dressing for a wedding or formal occasion, so here’s the second part: How to do your makeup for a special event!
Today’s makeup tutorial comes from Brig herself and features some of the bestselling products from the Brigitte Brianna Cosmetics line along with some of her other favorite cosmetics. (Wait till you see which product she’s been using since junior high!)
Whether you’re headed to a party, doing a photoshoot, or just feeling in the mood for a knockout look, we’ve got step-by-step instructions below for a glamorously fresh face.
(*Note: This post is not sponsored.)
Step 1: Start with a clean, fresh face.

This may seem like an obvious first step, but it’s an important one. A clean face is the key to easy makeup application and a glowy finish. Use a gentle cleanser that works with your skin type. Not sure what skin type you have? Check out this guide from CeraVe.)
Step 2: Apply moisturizer.

Now that you’ve got a clean face, the next step is to apply moisturizer. Since Brig has “super dry skin,” she uses CeraVe moisturizing cream. (Again, choose a moisturizer that’s compatible with your skin type.) Apply lotion all over your face.
Step 3: Apply foundation.

Next up: foundation. She doesn’t use it daily, but for pictures or special occasions Brig uses Estee Lauder Double Wear foundation in the color Wheat. Apply it all over your face with a brush. Don’t forget to do it under your chin and neck so that it blends well!
Step 4: Apply eyeshadow.
(Brig says she does this a little differently because most people do eyes before foundation. So feel free to switch these steps up if you’d like!)

Time to add a little dimension to your eyes! First, apply eyeshadow to your eyelid. (Brig uses the Willow color from her BB cosmetics line. This color is universally flattering!) Brush the eyeshadow all over your lid up to the crease of your eye.

Next, apply a darker crease color (Pebble is gorgeous). Tap it in the eyeshadow and gently tap the brush to remove excess powder from the top. In small, circular motions back and forth, apply the darker color into the crease of your eye.
Step 5: Blend with a big brush.

Using a large brush, blend your face makeup. This will remove excess makeup or eyeshadow fallout from your face.
Step 6: Apply blush.

Time for a little pop of color! While Brig loves both BB Cosmetics powder and cream blushes, she loves that the cream blush can also be used on your lips. (Win-win!) Using a makeup brush, apply the blush by first tapping on the cheekbone and then going back and forth. You can choose how heavy you want the blush depending on how much you want your cheeks to pop. “I do a little bit heavier makeup when I’m doing pictures,” says Brig.
Step 7: Brows.

Here’s the thing about brow pencils — Brig tried to create one for the BB collection, but she couldn’t make one that she loved better than her favorite: the Anastasia Brow Wiz in Soft Brown. “You use what you love. I can’t compete with this. This is still my favorite,” she says. Brush your brows out with the brush end, lightly fill in using the pencil, and then brush again.
Step 8: Contour.

If you’re going for a super glam look, it’s time to contour your nose using a contour stick. Brig uses a dark brown color, and here’s her trick: use an eyebrow razor (or you could use your eyebrow pencil), hold it in the middle of your nose, and draw a line on either side and tip of your nose.

Blend it with a slightly damp makeup sponge. (You’ll add a lighter color in the next step.)
Step 9: Add illuminator.

Use the BB Cosmetics Peach Pop Illuminator to brighten the top of your cheekbones and middle of your nose. Dab the illuminator with a brush, tap off excess powder, and apply it to the top of your cheekbone just above the blush area.

To highlight your nose, tap your finger in the illuminator and lightly dust down the middle of your nose and rub it in. This makes everything pop when the light catches it. Super pretty!
Step 10: Lips.
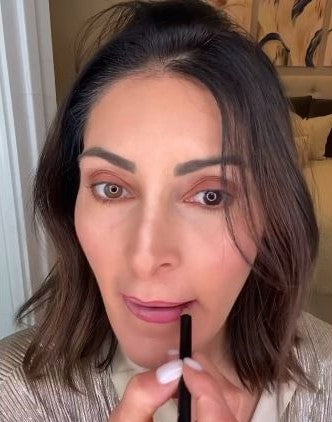
Line your lips with the Roseberry lip pencil. (Tip: to make your lips appear bigger, line the outside of your lips.) Fill in the lip liner just a little bit on your lips and blend.

Add Lullaby lipstick over the top. The lip liner helps the lipstick hold and stay within the lines.
Step 11: Eyeliner and mascara.

For eyeliner, Brig uses the L'Oréal eye pencil in black. (If you choose to line your waterline, make sure you pick something that’s waterproof like this one.)

Now for one of Brig’s longtime faves: the L’Oreal Paris Makeup Voluminous Original Volume Building Mascara in Carbon Black. “I’ve literally used the same mascara since junior high. I love this one the very most,” she says. And for the $6 price on Amazon, you really can’t beat it.
Bonus step: Extra lashes.
You can stop with the mascara, but if you want a more glammed up look, add some false lashes to finish everything off! Brig cuts her false lashes so they fit and don’t go over the edge or poke her in the eye. The trick to achieving the perfect false lash look? Wait 90 seconds until the glue is tacky. If you stick them on while they’re wet, they won’t work. (Besides, this gives you a chance to touch up your makeup or warm up the curling iron.)


Applying lashes can be tricky, so here’s Brig’s secret: look down into a handheld mirror so your eyelid is partly closed when you apply the lashes. This makes it so your own lashes don’t get in the way.
- Stick the lash right in the middle of your lash line.
- Hold the inner corner down with tweezers right against the skin on the lash line. Hold for just a second until it’s nice and stuck.
- Grab the outer corner and stick it on the lash line.
- Finally, gently press the tweezers along the lash line to make sure the lash is stuck all across the lid.
Et Voila! You’re ready to knock ‘em all dead at that party — or turn some heads at Target, or wherever you’re headed! Don’t forget to take a selfie and tag us on Instagram so we can ooh and ahh at your pretty face.
Put your best face forward with the Brigitte Brianna Cosmetics collection!

Even if you have nowhere to go, freshening up your face does wonders for your mood! The Brigitte Brianna Cosmetics line can help you boost that beautiful confidence. With paraben-free, gluten-free, and cruelty-free cosmetics, all manufactured in the USA, we’ve created a one-stop-shop for you to get all of the makeup essentials to simplify your morning routine and help you look and feel your best.
Your makeup routine doesn’t have to be complicated or costly. Treat yourself to some high-quality cosmetics and take your look to the next level.


Leave a comment